How to Indent in Word: Effective Tips to Enhance Document Formatting
Whether you’re drafting a formal report, creating a professional presentation, or preparing an essay, mastering how to indent in Word is crucial for ensuring clarity and enhancing the visual appeal of your documents. This guide will provide you with effective tips on indenting in Word, covering everything from basic indentation settings to advanced formatting techniques. Let’s dive into the various methods to format your Word documents for maximum impact.
Understanding Word Indentation Basics
Before we delve into the specifics of **setting indentation in Word**, it’s essential to understand what indentation means in the context of word processing. Indentation involves adjusting the placement of paragraphs within your document, making it more visually appealing and easier to read. A well-structured document with proper **word paragraph indents** not only looks professional but also improves readability. Indents can be applied to the first line of a paragraph, to the left margin, or to the right margin, depending on your formatting needs.
The Different Types of Indents in Word
Microsoft Word offers several options for **creating indents in Word**. These include:
- First Line Indent: This type of indent is commonly used for new paragraphs. It pushes the first line of the paragraph inwards, making each paragraph distinct from the previous one.
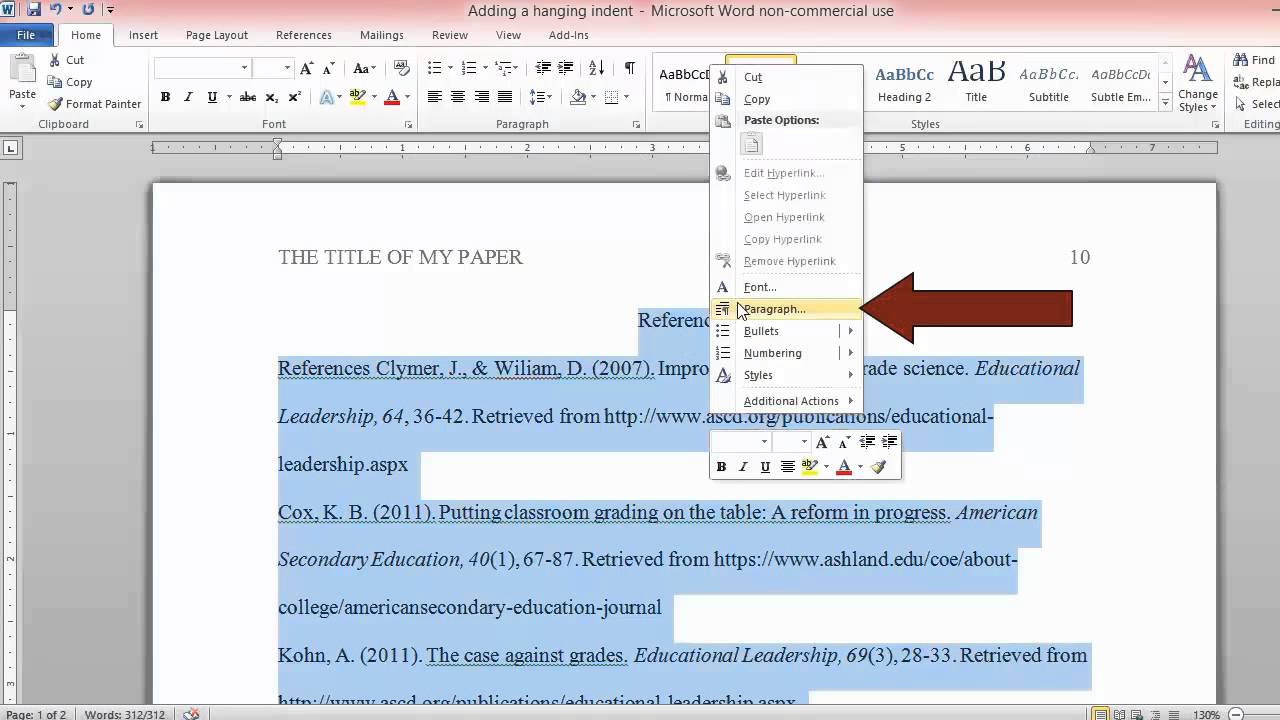
- Hanging Indent: Often used in bibliographies or reference lists, a hanging indent indents all lines of a paragraph except for the first line, which remains flush with the left margin.
- Left and Right Indents: Adjusting the left and right margins can help in aligning the text within the document without changing the overall width of the page.
Understanding these types of indents will equip you with the knowledge to utilize **Word indentation options** effectively within your documents.
How to Adjust Indentation in Word
To **adjust indentation in Word**, follow these simple steps:
- Select the paragraph you want to format.
- Go to the “Layout” or “Page Layout” tab in the toolbar.
- In the “Paragraph” section, you will find options for **indent left and right in Word**, as well as options for **first line indent** and **hanging indent** tailored to your needs.
- Enter the desired measurements in inches or use the push buttons to visually set your indents.
By mastering these steps, you can navigate through **managing indents in Word** with ease and style your document professionally.
Using Word Indent Shortcuts
Did you know you can efficiently manage your indentation in seconds using keyboard shortcuts? Understanding these **word indent shortcuts** can dramatically reduce the time spent formatting each paragraph.
Common Word Indentation Shortcuts
Here are some helpful shortcuts that make **changing indentation in Word** quick and easy:
- Increase Indent: Press Ctrl + M to increase the indent of the selected paragraph. This pushes it further from the left margin.
- Decrease Indent: Press Ctrl + Shift + M to decrease the indent, bringing the paragraph closer to the left margin.
These shortcuts help streamline your **document styling in Word** and make it easier to focus on content creation without getting distracted by formatting issues.
Creating Indents for Bullet Points
Using bullet points can enhance clarity in your documents, but it’s equally important to ensure they’re properly formatted. To manage **indents for bullet points in Word**, simply:
- Highlight the bulleted list.
- Adjust the indent settings from the “Paragraph” section in the toolbar, just as you would with regular text.
- You can use the same shortcuts mentioned earlier to fine-tune your indentation.
This approach offers a clean, professional appearance that aligns your bullet points seamlessly with the overall document layout.
Customizing Indentation Settings
For more advanced users, customizing your **indentation settings in Word** can lead to greater flexibility and control over how your documents appear. With custom settings, you can establish preferences that apply across different documents—an excellent way to ensure consistency in all your produced work.
Setting Up Default Indentation in Templates
To set up default indentation in your Word templates, follow this procedure:
- Open a new document and adjust your indentation as desired in the “Layout” tab.
- Go to “Styles” and right-click on the paragraph style you want to modify.
- Select “Modify” and check the box that says “New documents based on this template.”
This ensures every new document adopts the set margins, significantly improving your **word document formatting** across all expressions of your work.
Examples of Customized Indentation
Consider a scenario where you have a company report and wish to indicate separate sections. You might employ a hanging indent for the references area and a first line indent for each new section. This distinct organizational structure not only enhances visual flow but aids in navigation for readers perusing your document.
Practicing Word Formatting Tips
Incorporating **word formatting tips** and best practices into your work can transform a basic document into a standout piece. Let’s explore some techniques crucial for optimizing your document’s appearance.
Improving Document Readability
To enhance **reading efficiency**, consider spacing between lines and paragraphs. Implement a line spacing of 1.5 or 2 for clearer text flow, and ensure to maintain consistent **document appearance enhancements** throughout.
Creating a Professional Layout
Your choice of font, size, and color plays a significant role in your document’s styling. Stick to a standard font such as Times New Roman or Arial, size 11 or 12 for the body text, and use colors that align with professional standards.
Key Takeaways
- Mastering **how to indent in Word** will significantly improve your document’s formatting.
- Utilize keyboard shortcuts for fast adjustments and define default settings for efficiency.
- Customizing indentation settings can lead to consistency across multiple documents.
- Maintaining clear readability and professional layout ensures that your text makes a strong impact.
FAQ
1. What are the steps to create a hanging indent in Word?
To create a hanging indent in Word, select the paragraph you wish to format. Then, go to the “Paragraph” settings in the “Layout” tab and under “Indentation,” choose “Hanging” from the “Special” dropdown. You can adjust the indentation measurement to suit your preferences. Finally, click “OK” to apply your changes.
2. How can I adjust line spacing in Word?
To adjust line spacing in Word, select the text or paragraph you want to format. Navigate to the “Layout” tab, find the “Line and Paragraph Spacing” option, and select your desired spacing. You can choose from single, 1.5 lines, double, or custom spacing to improve your document’s readability significantly.
3. Are there any shortcuts for adjusting indents quickly?
Yes! You can quickly increase the indent by pressing Ctrl + M and decrease it by pressing Ctrl + Shift + M. These shortcuts make formatting changes efficient, allowing you to focus on content creation without getting bogged down by manual adjustments.
4. Can I set default indentation for all new Word documents?
Yes, you can set default indentation by modifying the styles in a new document. After customizing the indent settings, right-click the paragraph style in the “Styles” pane, select “Modify,” and check “New documents based on this template.” This ensures all future documents follow your established formatting rules.
5. How to indent bullet points differently from regular paragraphs?
To indent bullet points differently, highlight the bulleted list and access the “Paragraph” settings from the “Layout” tab. You can set distinct indent measurements for the bullet points compared to normal text, enabling personalized formatting of lists versus paragraphs.
6. What is the benefit of using first line and hanging indents?
Using first line and hanging indents aids in creating a cleaner layout, facilitating easier navigation through your text. First line indents signal the start of a new paragraph, while hanging indents organize bibliographies or references by making all lines except the first one uniformly indented.
7. How can I ensure consistency in document formatting?
Maintaining consistent document formatting can be achieved by updating default styles, setting up templates with predefined indentation, and routinely using the same formatting tools. By applying the same guidelines across your documents, you enhance professionalism and usability.
Incorporating these techniques will ensure that your documents are not only well-formatted but also visually appealing and easy to navigate. By following this guide, you can effectively enhance your **Word document formatting** skills.