How to Properly Lay Pavers: A Modern Guide for Effective Outdoor Design in 2025
Laying pavers can beautifully transform your outdoor space, merging functionality with aesthetic appeal. Whether you’re aiming for a DIY landscape project or hiring a professional, understanding the essentials of **how to lay pavers** effectively is vital for achieving long-lasting results. In this modern guide, we will explore the step-by-step techniques for **paver installation**, including preparing the ground, selecting **paver materials**, and maintaining your new outdoor addition.
Preparing the Ground for Pavers
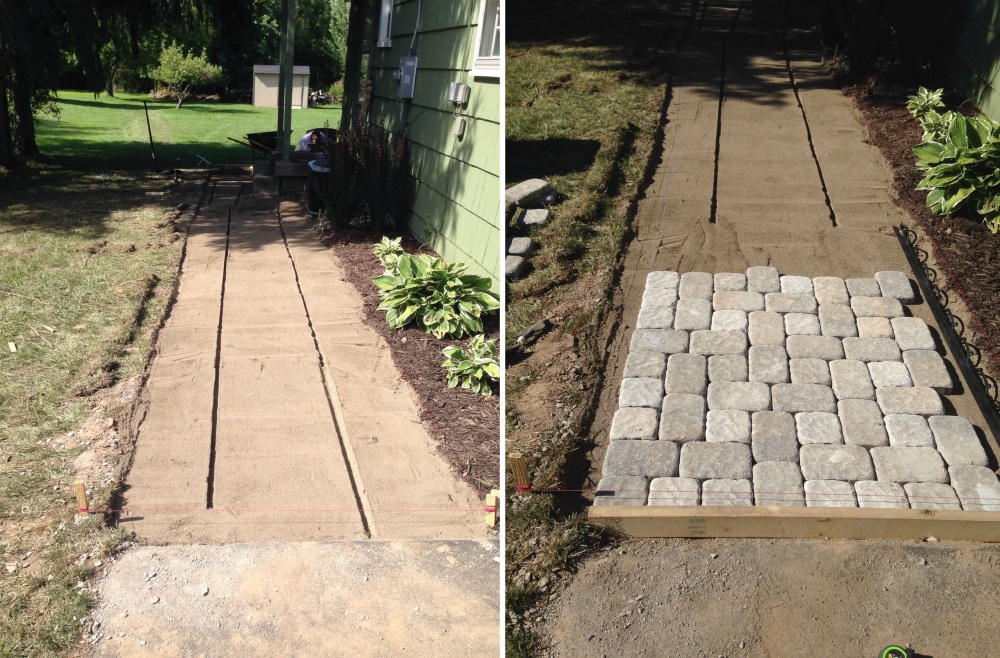
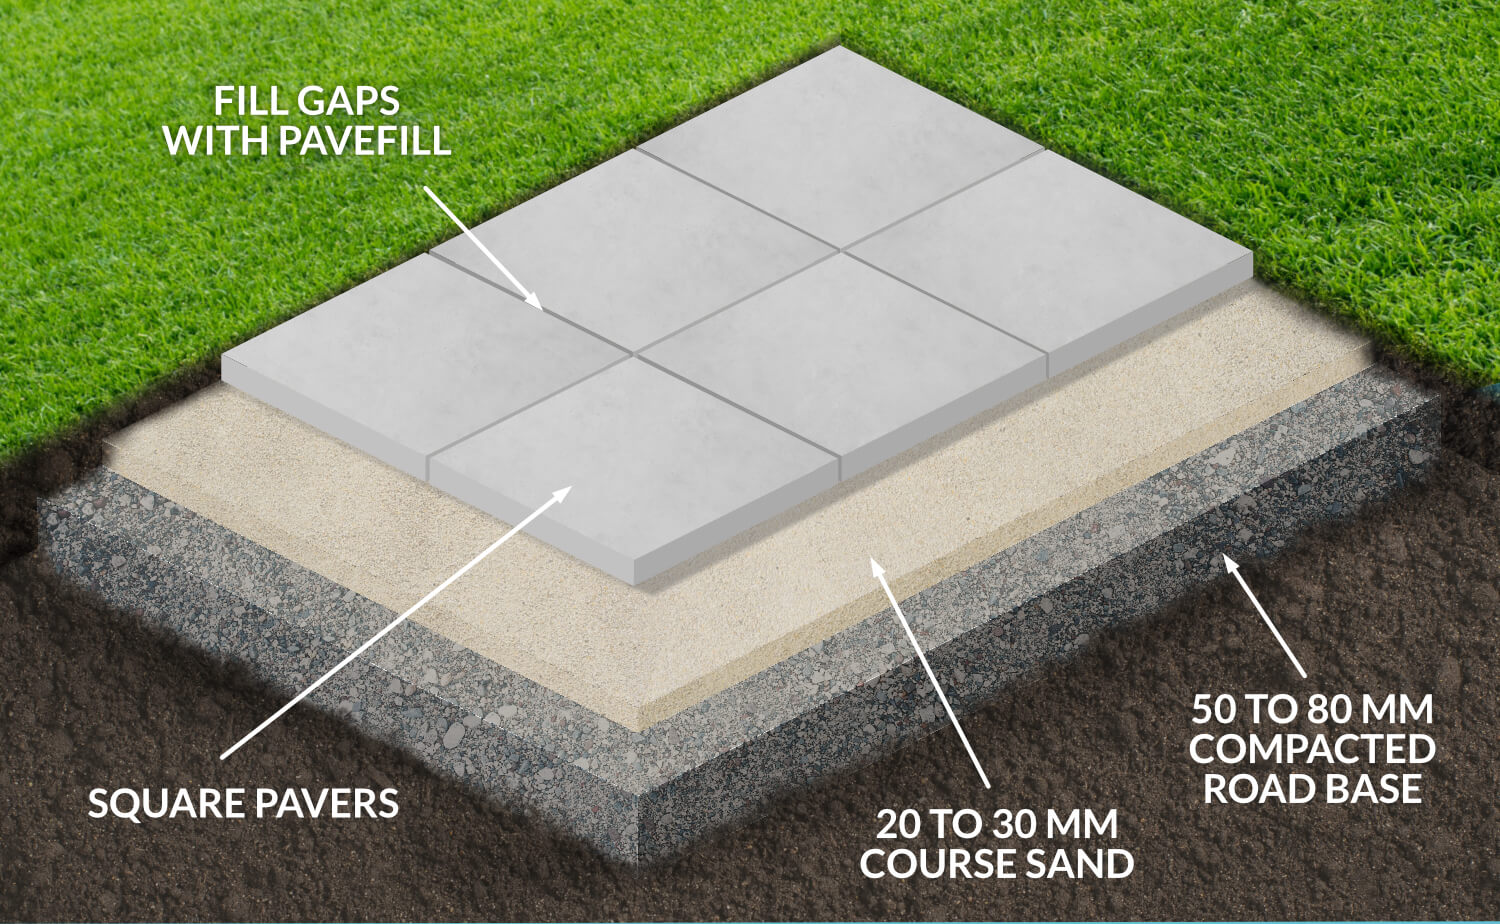
Before commencing any laying of pavers, ensuring that the **ground is properly prepared** is crucial. This process typically involves clearing the area of debris, plants, and soil that might impede stability. Start by marking the layout of your intended design. Use spray paint or landscaping stakes to outline where the **paver stones** will be laid. It’s equally vital to check the **drainage for pavers**; a well-drained area reduces future issues with water puddling or the shifting of pavers over time. Moreover, building a slight slope from structures helps water flow away.
Tools for Laying Pavers
Having the right **tools for laying pavers** can significantly enhance your efficiency and accuracy. Essential tools include a shovel, level, rubber mallet, and a compactor for solidifying the base. A **paver installation manual** can guide how these tools should be utilized throughout the project. For homeowners using larger pavers or performing intricate designs, additional tools like a masonry saw for **cutting pavers** may also be necessary. Familiarize yourself with each tool to ensure a smoother workflow.
Choosing and Measuring Paver Base Materials
The **paver base materials** play a crucial role in the long-term success of your installation. A common choice is a gravel base, which provides excellent drainage and stability. For determination, assess the required thickness based on the expected traffic flow over the pavers; typically, a **base depth of 4 to 6 inches** is recommended for driveways while a depth of about 3 inches suffices for patios or walkways. Moreover, accurate **measuring of pavers** will save time and resources, ensuring you purchase the correct amount of materials.
Paver Patterns and Layout Planning
With the groundwork set, consider design aesthetics through various **paver patterns**. An organized layout not only elevates the visual appeal of your outdoor space but also enhances its practicality. Simple patterns like straight rows can be effective, especially when combined with unique header courses. For those feeling more adventurous, opt for herringbone or random designs for added character. When **installing paver stones**, take care to account for any cuts needed at the edges and how they’ll blend into the overall design.
Step-by-Step Guide to Laying Pavers
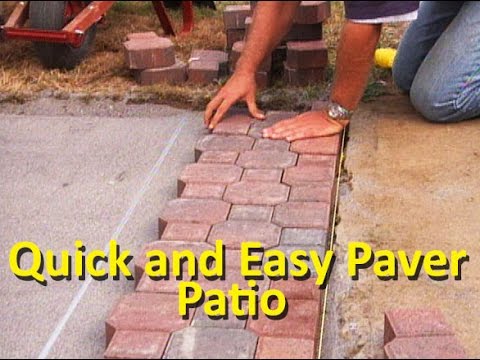
Engaging in a **step-by-step paver guide** can guide you through the intricate installation process. After achieving your leveling sand for pavers and ensuring the base is compacted, start laying your first paver at one corner, maintaining appropriate spacing for sand joints (optimal spacing is 1/8”). After completing the first section, use a rubber mallet to ensure the pavers settle into place properly. Continue laying all the pavers, checking frequently for level and alignment, and don’t forget to periodically compact the base.
Paver Edging for Stability
Implementing **paver edging** ensures that the pavers remain firmly in position and reduces the risk of shifting. Plastic, metal, or concrete edging all serve effectively, but opt for materials that suit your specific leading edge design. Attach the selected edging after laying the last pavers to prevent any future movement. Proper edging also enhances durability by mitigating wear caused by lawnmowers or erosion.
Compacting and Sealing Pavers
Once the pavers have been laid, the next essential step is **compacting base for pavers** to ensure stability and longevity. Use a vibratory plate compactor, pressing down evenly across all paver sections. This action assists in settling the pavers securely into the sand base. Following compaction, fill the joints with jointing sand to prevent pavers from moving and allow for water drainage.
Paver Sealing Methods
Sealing your pavers is critical to protect against stains, enhance colors, and add longevity. There are two main **paver sealing methods**: topical and penetrating sealers. Topical sealers create a protective surface layer, while penetrating sealers act to repel water and resist stains from within. When selecting your sealer, consider your local climate and usage; those in wet, rainy areas might benefit more from penetrating options. Applying the sealer is generally straightforward — use a roller or sprayer — but ensure proper ventilation and adequate drying time.
Maintenance Tips for Pavers
Maintaining your pavers involves routine checks for weeds, grass, and dirt that can accumulate over time. **Paver maintenance tips** include regularly cleaning the surface, refreshing the sealant as needed, and managing joint sand on an annual basis depending on weather conditions. Inspect for any cracks or displacements after harsh weather and promptly resolve issues to maintain the integrity of the entire installation. This diligence not only sustains the aesthetic but also increases functionality.
Exploring Outdoor Paver Ideas
As you finalize your installation, contemplate various **outdoor paver ideas** that can round off your design. Creating a paver patio allows for a versatile outdoor dining area. Alternatively, consider pathways between garden beds or **backyard paver ideas** that add structure amidst greenery. The inclusion of interlocking pavers can provide programmable possibilities with designs that enhance visual appeal while ensuring functional layouts.
Paver Design Ideas for Gardens
Incorporating **paver design ideas** into gardens can bring dynamism and clarity to the plant structures. Use pavers as borders to delineate plant beds, ensuring it visually populates vacant areas and structuring the flow of your gardening. Grass or creeping thyme interspersed among pavers can produce striking visual contrasts as plants grow and flourish, creating an inviting eco-lounge style that draws outdoor gatherings.
Cost-Effective Paver Solutions
With careful planning, you can discover several **cost-effective paver solutions** that do not sacrifice quality or aesthetics. Consider sourcing local materials or opting for concrete pavers that generally present lower overall costs compared to various stone options. Bulk discounts from suppliers also help in managing expenses. By choosing a simpler layout or design pattern, you can also save on the need for complex cutting tasks later in your project.
Key Takeaways
- Proper preparation and planning are crucial for laying pavers effectively.
- Choosing the right tools and materials enhances efficiency and durability.
- Variety in paver patterns and designs can enrich outdoor aesthetics.
- Regular maintenance will prolong the life of your paver installation.
- Innovative paver ideas can seamlessly integrate your Outdoors.
FAQ
1. What are the common mistakes in paver installation?
One common mistake is failing to prepare the ground properly before starting the installation. Ignoring drainage issues can lead to future problems. Additionally, improper spacing between pavers or not compacting the base adequately may cause shifting or uneven settling.
2. How do I maintain my pavers seasonally?
Seasonal maintenance of your pavers includes cleaning to remove any organic matter, resetting joints filled with sand, and checking for loose stones or cracks. In colder climates, ensure that snow and ice do not build up as these can cause damage if not managed correctly.
3. Can I install pavers without professional help?
Yes, many homeowners successfully undertake DIY paver projects with the right tools and preparation. However, consider factors such as scale, complexity, and your level of expertise. For larger or intricate designs, hiring a paver contractor might save you time and ensure quality work.
4. What are the benefits of using pavers over concrete?
Pavers offer greater flexibility, aesthetic variety, and easier repairs in comparison to traditional concrete. They also provide better drainage options and can beautify spaces according to individual preferences, allowing for unique designs that complement the surrounding landscape.
5. How do I choose the right pavers for my project?
Choosing the right pavers involves considering the type of project and desired aesthetics. Look at options like concrete, brick, or natural stone based on height, design, and traffic expectations in the area. Test various **color options for pavers** to find a suitable match for your outdoor theme.