How High to Hang Pictures for a Modern Home in 2025
Determining the right height to hang pictures can significantly enhance the aesthetics of your modern home. In 2025, understanding the best practices and measures will ensure that your wall art looks stunning and feels cohesive with your space. This article provides essential insights and practical tips on the optimal height for hanging pictures, using the right tools, and avoiding common mistakes, allowing you to showcase your pictures beautifully.
Understanding the Ideal Height for Hanging Pictures
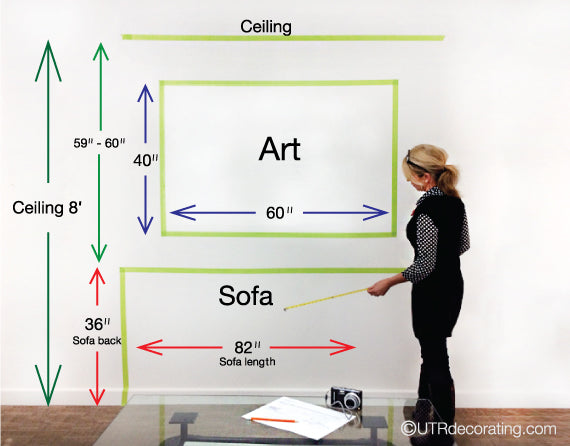
Deciding on the **best height to hang wall art** is crucial, and it often starts with understanding eye levels. Many interior designers recommend that art should generally be hung at the eye level of most adults—which averages around 57 to 60 inches from the floor to the center of the artwork. This guideline provides a basis from which adjustments can be made based on furniture and specific room dynamics. Assessing the **height for family photos** or art in children’s spaces might require slight modifications, ensuring that these pieces resonate with their intended audience.
Key Guidelines for Picture Hanging
When thinking about the **picture hanging guidelines**, consider the space around your pictures. A common rule is to keep art at eye level, but adjustments may be necessary for various furniture items like sofas or tables. When mounting pictures above furniture, for instance, aim for the bottom of the frame to sit about 6 to 12 inches above the piece of furniture. This adjustment not only creates **height considerations for picture frames** but also grounds the art to the room’s context.
Spacing Between Hung Pictures
The **spacing between hung pictures** contributes to the overall visual appeal. Aim for around 2 to 4 inches between smaller frames and 4 to 6 inches for larger, gallery-style displays. Consistency in spacing can also aid in achieving a cohesive look, fostering a visual dialogue between the pieces, and enhancing the wall art placement within your home. For a more dynamic arrangement, experiment with staggered picture hanging techniques, which incorporate varying heights and orientations, adding depth to your design.
Adjusting Height for Furniture
Each room presents unique challenges when deciding how high to hang pictures. The **adjusting height for furniture** plays a vital role, especially in shared spaces like living rooms. For example, if you’re hanging artwork over a couch or a console table, ensure that the pieces are well above eye level to create a focal point. Additionally, consider how to create a visual balance, taking into account the size of the furniture and the height from the floor to where the lowest point of art will be displayed.
Practical Tips for Hanging Pictures Naturally
Implementing **tips for hanging pictures** effectively can mitigate mistakes and enhance your room’s ambiance. For instance, using a level for hanging pictures can help maintain straight lines, crucial for both single frames and collections. Utilizing a measuring tape for picture hanging will ensure proper placement without any guesswork. As a best practice, it can be beneficial to create a template or mock-up on the wall using painter’s tape to visualize arrangements before making nail holes.
Using Picture Hanging Tools
Incorporating the right **picture hanging tools** not only streamlines the process but also reduces the risk of damage to your walls. Wall anchors for heavy pictures are essential if you’re hanging sizable frames, preventing potential falls that could damage both the artwork and your walls. Note that using a level tool for pictures during installation will provide professional and polished results, allowing each piece to shine in its designated spot.
Decorating with Pictures in Various Spaces
When **decorating with pictures**, remember that each room has different dimensions and functions. For instance, hanging pictures in a living room should consider social dynamics, opting for art that stimulates conversation. Conversely, in private spaces like bedrooms or studies, art may inspire tranquility or focus. Understanding how to arrange art on walls in a way that adapts to various environments enhances the overall feel of your home and your interaction with it.
Gallery Wall Arrangement Techniques
Consider **gallery wall arrangements** for a modern feel in your home. Arranging multiple images creates a unique focal point in any space. You might want to display a selection of art that shares a common theme or color palette for harmony. Alternatively, you can opt for a mix of different sizes, spacing them to create a visually engaging experience. Always ensure accessibility for viewers appreciating your art, adjusting heights accordingly to prioritize engagement.
Common Picture Hanging Mistakes and Solutions
Despite careful planning, many homeowners fall victim to **avoiding picture hanging mistakes** that can wreck their planned decor. One common mishap is hanging pictures too high, which detaches the art from the space’s context. To counter this, use proportional visual guidelines—coupling art with nearby furnishings provides a more visually appealing arrangement. Also, neglecting the visual weight of each piece or ignoring the dominant colors may lead to unbalanced and awkward displays.
Considerations for Height in Unusual Spaces
Hanging pictures in tight spaces requires additional creativity. Concerning **hanging art in unusual spaces**, such as hallways or staircases, leveraging vertical height can be beneficial. For hallways, a series of smaller pieces can make a statement without overwhelming the walls. Conversely, in an expansive staircase, staggered picture hanging techniques will draw the eye up without detracting from the wall’s architectural edges, adding to both charm and dimension.
Creating Depth and Focus with Picture Heights
Ultimately, balancing art on walls through effective heights creates depth in any arrangement. Carving out a theme with your art can also evoke emotion and storytelling through frequently positioned focal points. When **creating a focal point with pictures**, utilize larger pieces or collections to guide the viewer’s gaze to a specific moment or theme. This intentionality not only enhances your decor but celebrates each picture’s unique charm, allowing your home’s walls to tell a vibrant story.
Key Takeaways
- Hang pictures at eye level, typically between 57 to 60 inches from the floor.
- Adjust height based on furniture and create spacing between hung pictures.
- Utilize tools for accuracy, including levels and anchors for stability.
- Prevent common hanging mistakes by being mindful of visuals and balance.
- Create an engaging gallery wall to enhance the focal point of your home.
FAQ
1. What is the standard height for wall art?
The **standard height for wall art** is typically recommended to be centered at about 57 to 60 inches from the floor. This height records an optimal eye level for most adults, ensuring the artwork is appreciated without straining. Adjustments can be made based on the furniture beneath the art to maintain a cohesive look in your space.
2. How do I ensure pictures stay level when hanging them?
Using a **level tool for pictures** is essential to ensure your art pieces hang straight. Measure from the floor or another visual anchor, and keep the level alongside the frame while securing it to your wall. This approach will guarantee professional and polished results, avoiding frustrating visual tilts.
3. Can I mix different picture sizes on the same wall?
Absolutely! Mixing different picture sizes can add visual interest and depth to your display. Ensure you maintain consistent **spacing guides for pictures** to create harmony, and consider the overall balance of the gallery. Highlighting various sizes can enrich the art’s narrative within your home’s aesthetic.
4. What tools do I need for picture hanging?
Essential **picture hanging tools** include measuring tape, a level, wall anchors, and appropriate hanging hooks. These tools will help guarantee a secure and straight installation, leading to a polished finish. Consider additional accessories like templates or even command strips for easily adjustable art displays.
5. How should I group pictures for an effective display?
When **grouping pictures for effective display**, opt for a central focus point such as a larger piece or matching frame styles. Utilize staggering techniques for visual interest, ensuring consistent spacing between art pieces. This method cultivates cohesion and a captivating gallery that draws viewers in.